Solid State Doctor™ is created with ease of use in mind. Our interface screens should be able to guide you through the process of using the particular product you are using. Should you need product technical support, you can find answers in the help file. See below to view additional information and help files.
Setup
The software is installed on the system using standard Windows® supported installation software. The software must be installed and run from an account with full administrator account privileges. If your account does not have these privileges, you should contact your system administrator to have these privileges granted to your account. You will need at least local administrator privileges on the computer. This utility only runs on local SSD drives. On Windows® Vista and higher systems, if your account does not have full administrator privileges, you may receive an error that the program requires elevation. You can ignore this error and run the software from the Start Menu by right-clicking the program icon and choosing “Run as Administrator”.
Interface
When you launch Solid State Doctor™, you will be given a list of the available drives. You first select the drive you wish to work on, and then select the tool you would like to use or the test you would like to perform.
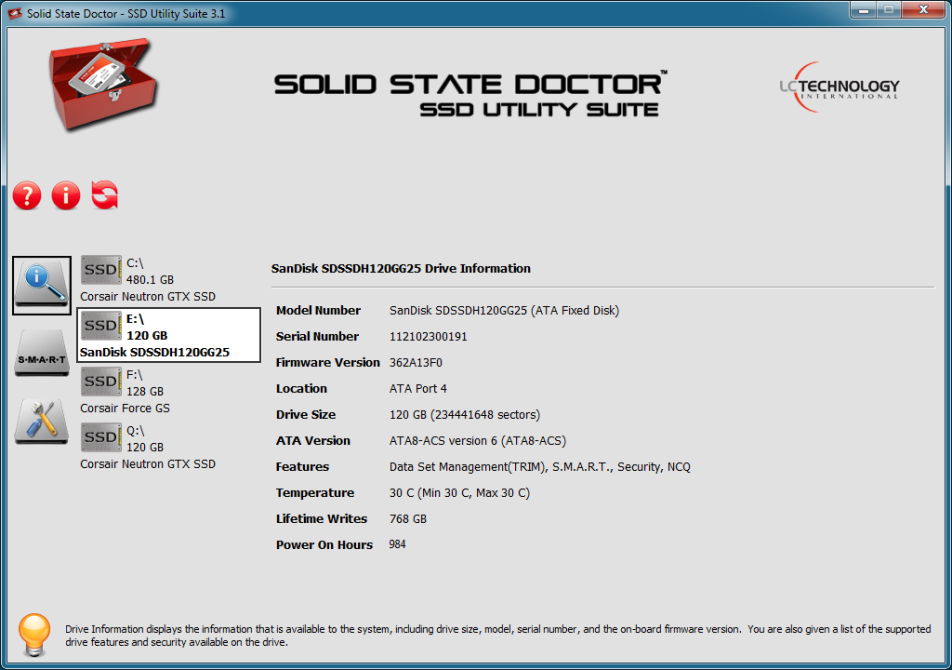
Drive Information
The Drive Information Tool will provide you with general information on the selected drive. This includes the items listed below:
Model Number
Serial Number
Firmware Version
Port Number
Drive Size
ATA Version
Supported Features
SSD Temperature
Lifetime Usage
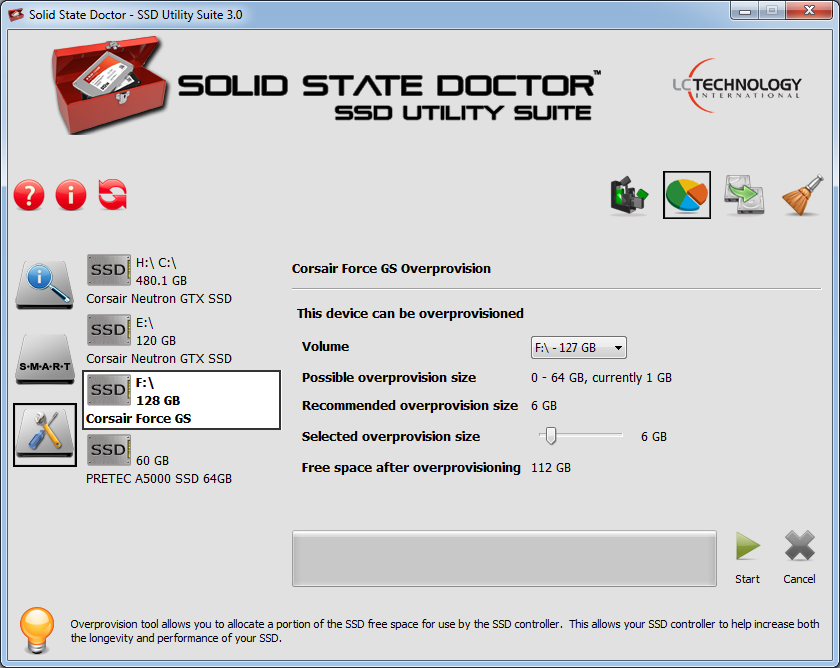
Overprovision Tool
The overprovision tool will allow the user to shrink an existing volume and allocate a portion of the free space on the SSD drive to be used by the SSD controller within certain guidelines. This overprovisioned space created on the drive will allow the controller to better manage and maintain the performance and longevity of the SSD drive.
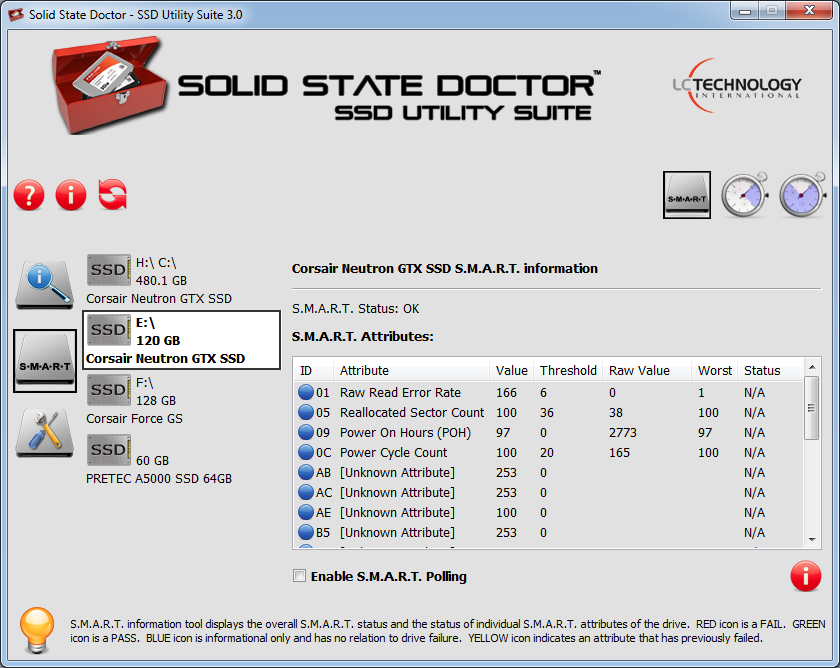
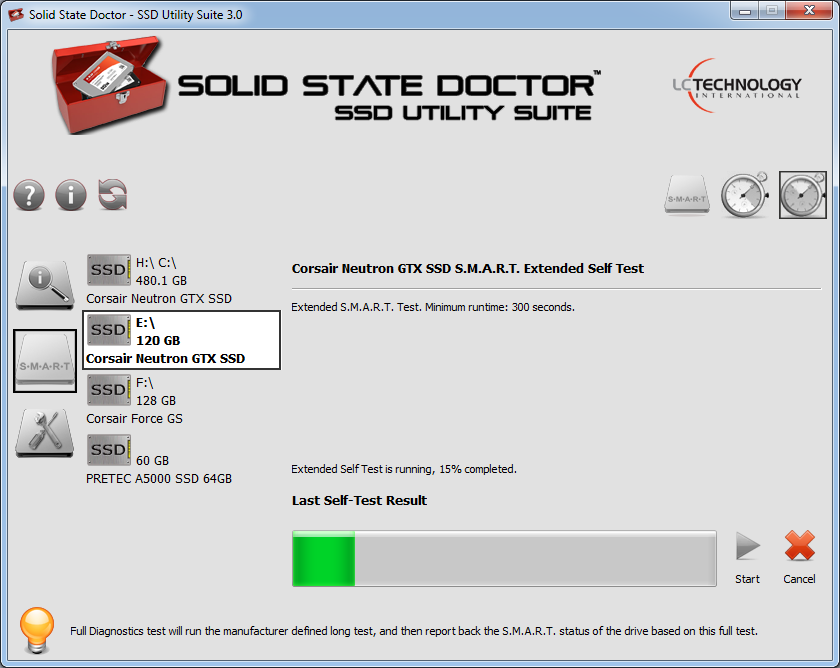
S.M.A.R.T. Status
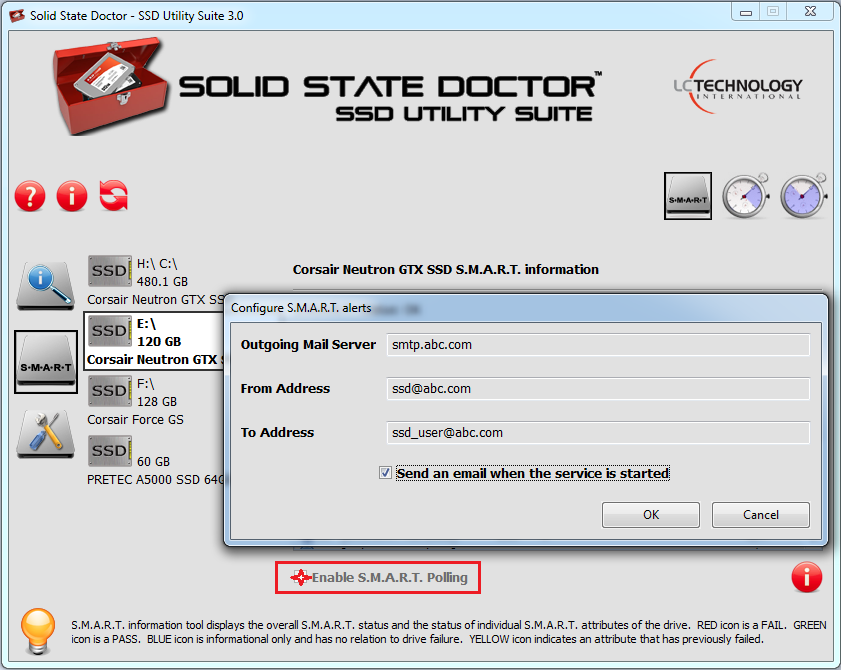
The S.M.A.R.T. Info tool will show you the current S.M.A.R.T. status of the drive overall as well as the status of individual attributes of the drive. The S.M.A.R.T. Polling feature allows the user to configure alerts via e-mail in the event one or more of the individual S.M.A.R.T. attributes have been exceeded indicating a failure occurring with the SSD drive. Solid State Doctor will poll the drive(s) every 60 minutes for any change to the attributes and will send an alert if any attributes are out of normal range.
Current
Configure Alerts (Polling)
Quick Diagnostic Self-Test
Full Diagnostic Self-Test
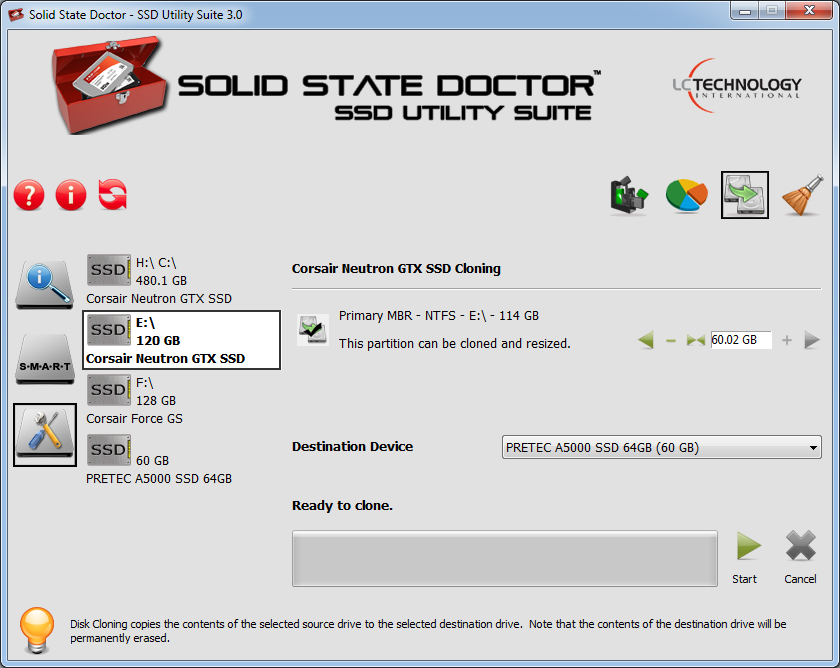
Disk Clone Tool
The Disk Clone Tool will copy the contents of the selected source drive to the selected destination drive. The Clone Tool will only be enabled if an SSD is detected in the system and is selected as the source or destination drive for the cloning. The cloning function supports upsizing and downsizing of partitions to be cloned to the destination drive allowing you to clone a larger capacity drive to a smaller capacity drive and vice versa. Simply change the partition size to accommodate the available drive capacity.
Select the source drive (i.e. existing system drive) you want to clone.
Next, select the destination drive that the source drive will be copied to. The destination drive should be “raw” (new/unused) with no file system or partitions on the drive. Make any adjustments to the partition size(s) to be cloned to the destination drive to accommodate the available capacity and select “Start”.
After cloning is finished, shut down the system first, then disconnect the old system drive (source), and move/connect the new system drive (destination) to the same SATA port as the old one.
When booting from the new drive for the first time, Windows may say that it did not shutdown properly – this is normal so don’t be alarmed. If you get that message, select “Start Windows Normally”.
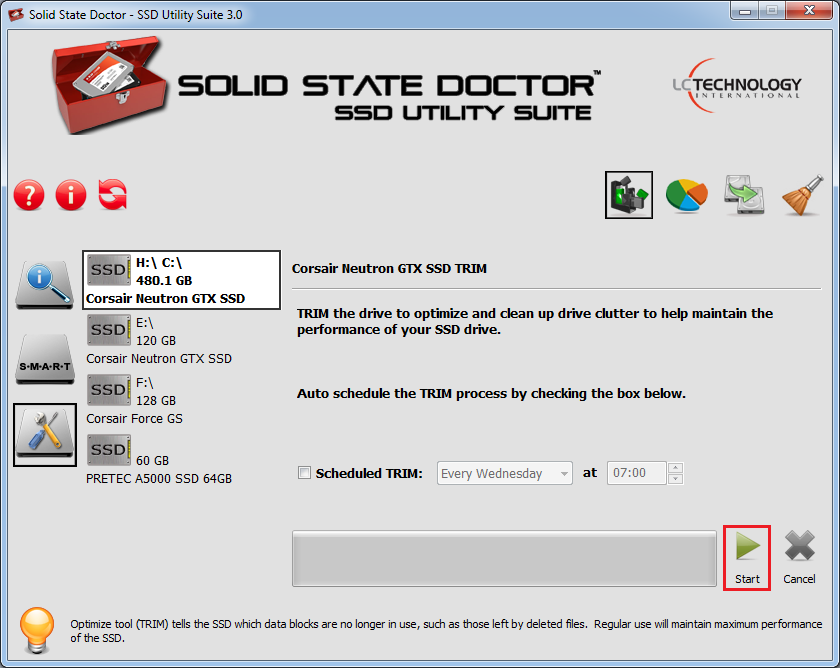
Optimize (TRIM) Tool
The Optimize Drive tool allows you to tell the SSD which data blocks are no longer in use, such as those left by deleted files. Normally, operations such as delete generally only means the data blocks involved are flagged as not in use. Bypassing this information down to the SSD controller, these blocks are cleared. This, in turn, helps maintain the write speed of the SSD.
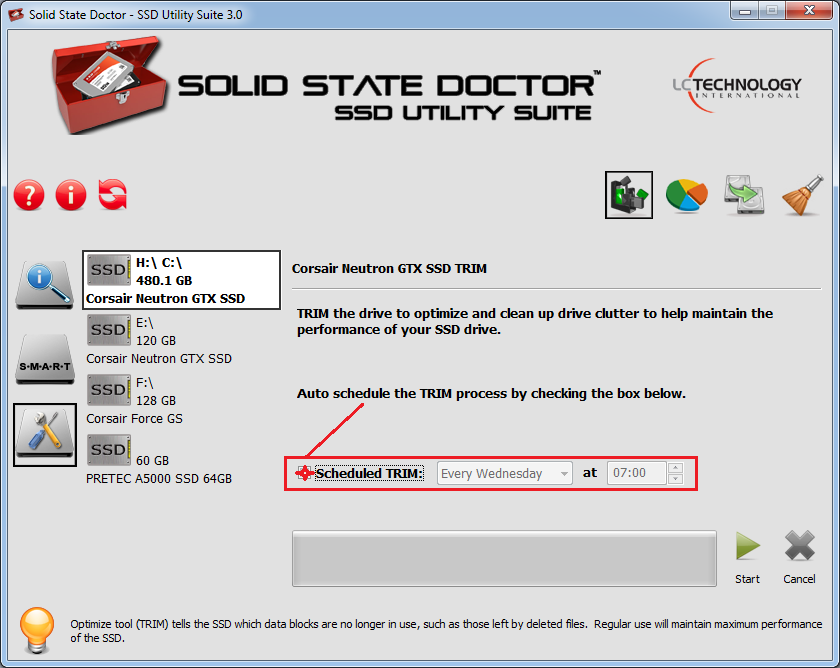
To auto-schedule TRIM, select the “Scheduled TRIM” box and set the frequency and time to run the TRIM process. The system will optimize your SSD drive(s) automatically based on the schedule set. Once the schedule has been set, the Solid State Doctor™ does not have to be running for the automatic operation to take place.
Manual Optimization
Scheduled Optimization
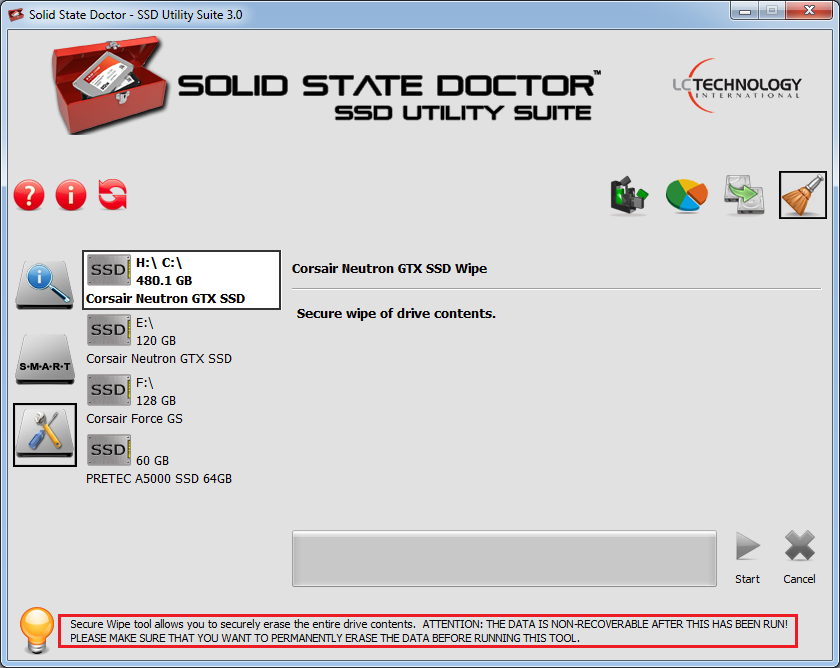
Secure Wipe Tool
IMPORTANT:Please note that the data is non-recoverable after this has been run. Please make sure that you are certain of the data you are erasing before running this tool.
The Secure Wipe Tool will completely and permanently erase the entire drive contents including partitions and file systems returning it to a raw state. Any data that was previously on the SSD drive will be non-recoverable at the end of this process.
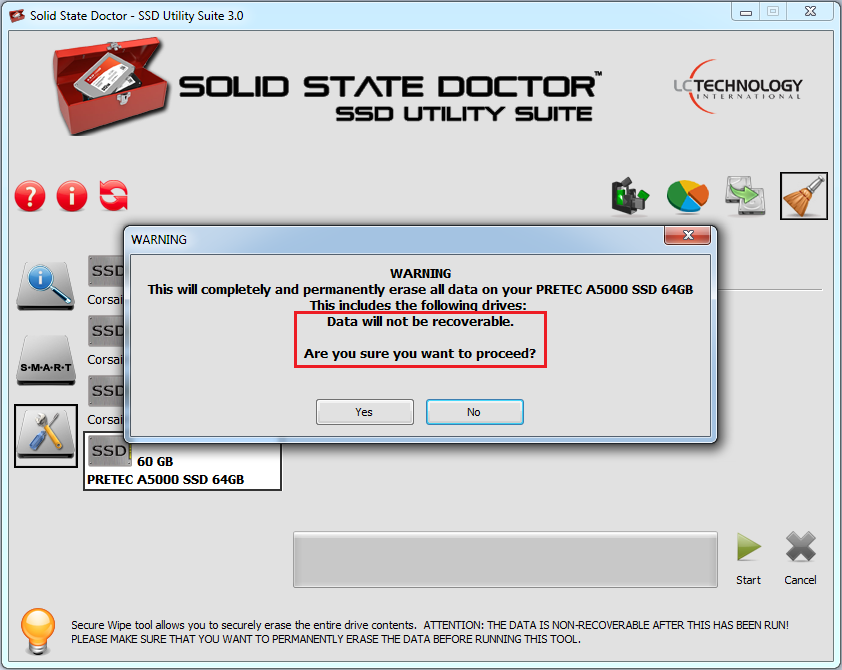
NOTE: The wipe function is disabled for system drives as a safety mechanism.
In addition, for non-system drives, you will receive a warning dialog to make sure that you want to permanently erase the contents of the selected drive. This warning will be your last chance to cancel/exit the operation.
Disabled for system drives
Confirmation dialog on non-system drives
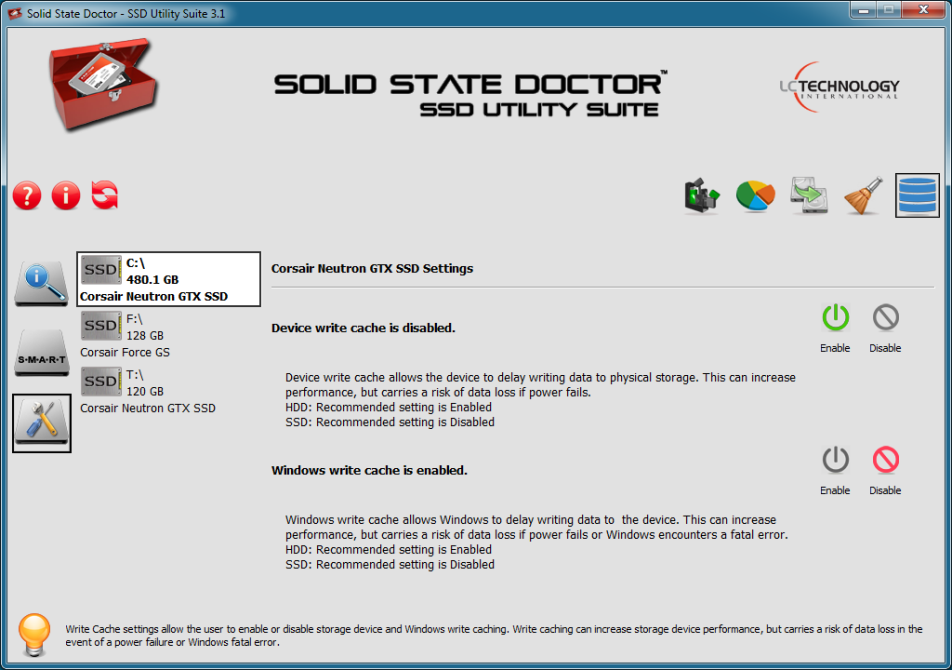
Write Cache Settings
The write cache settings allow the user to enable or disable either the physical drive’s write cache, Windows write cache or both. Enabling write cache can enhance the performance of the storage media, but at the risk of data loss or corruption in the event of a sudden power loss or Windows fatal error. Hard disk drives will benefit most from the write cache. For SSDs, you will have to determine if any gain in write performance is worth possible data corruption or data loss. It is recommended to disable the write cache when using SSDs.